Search This Blog

Friday 3 December 2010

1963 WV Split Screen Van Conversion to a Ice Cream Van

Hello to you all.....Here is a great project that we have been working on and nearing completion, its a restoration from a 1963 vw split screen van to a very nice ice cream van......this customer wants the best and WOW she is getting it, I have to undertake the re building of the original front single and double front seats.... including front  door cards and cab area headlining. There is also a bespoke side canopy being made by myself as you will see.......hope you all like.


This is a picture of the bus with all the welding just been done and the process of making the body work under way.........

Were do i start.......As you can see the dust and the years have not been so kind to these seats,


No door cards or kick boards.......these are long since rotted away and were thrown away and new ones made......


This is a Donner seat that i had , this was needed because the seat base on the original bus had rusted away .... so new seat had to be found.....Well almost new........loll.


Once all the covers were removed they were in quite good condition....so these were used as patterns for the new covers.....you can just see the black marks showing.....these help when re sewing the new covers......time for a cuppa..........


All unpick and ready for the cutting....i always lay out the material and place the old patterns on the new material to see how they fit...........


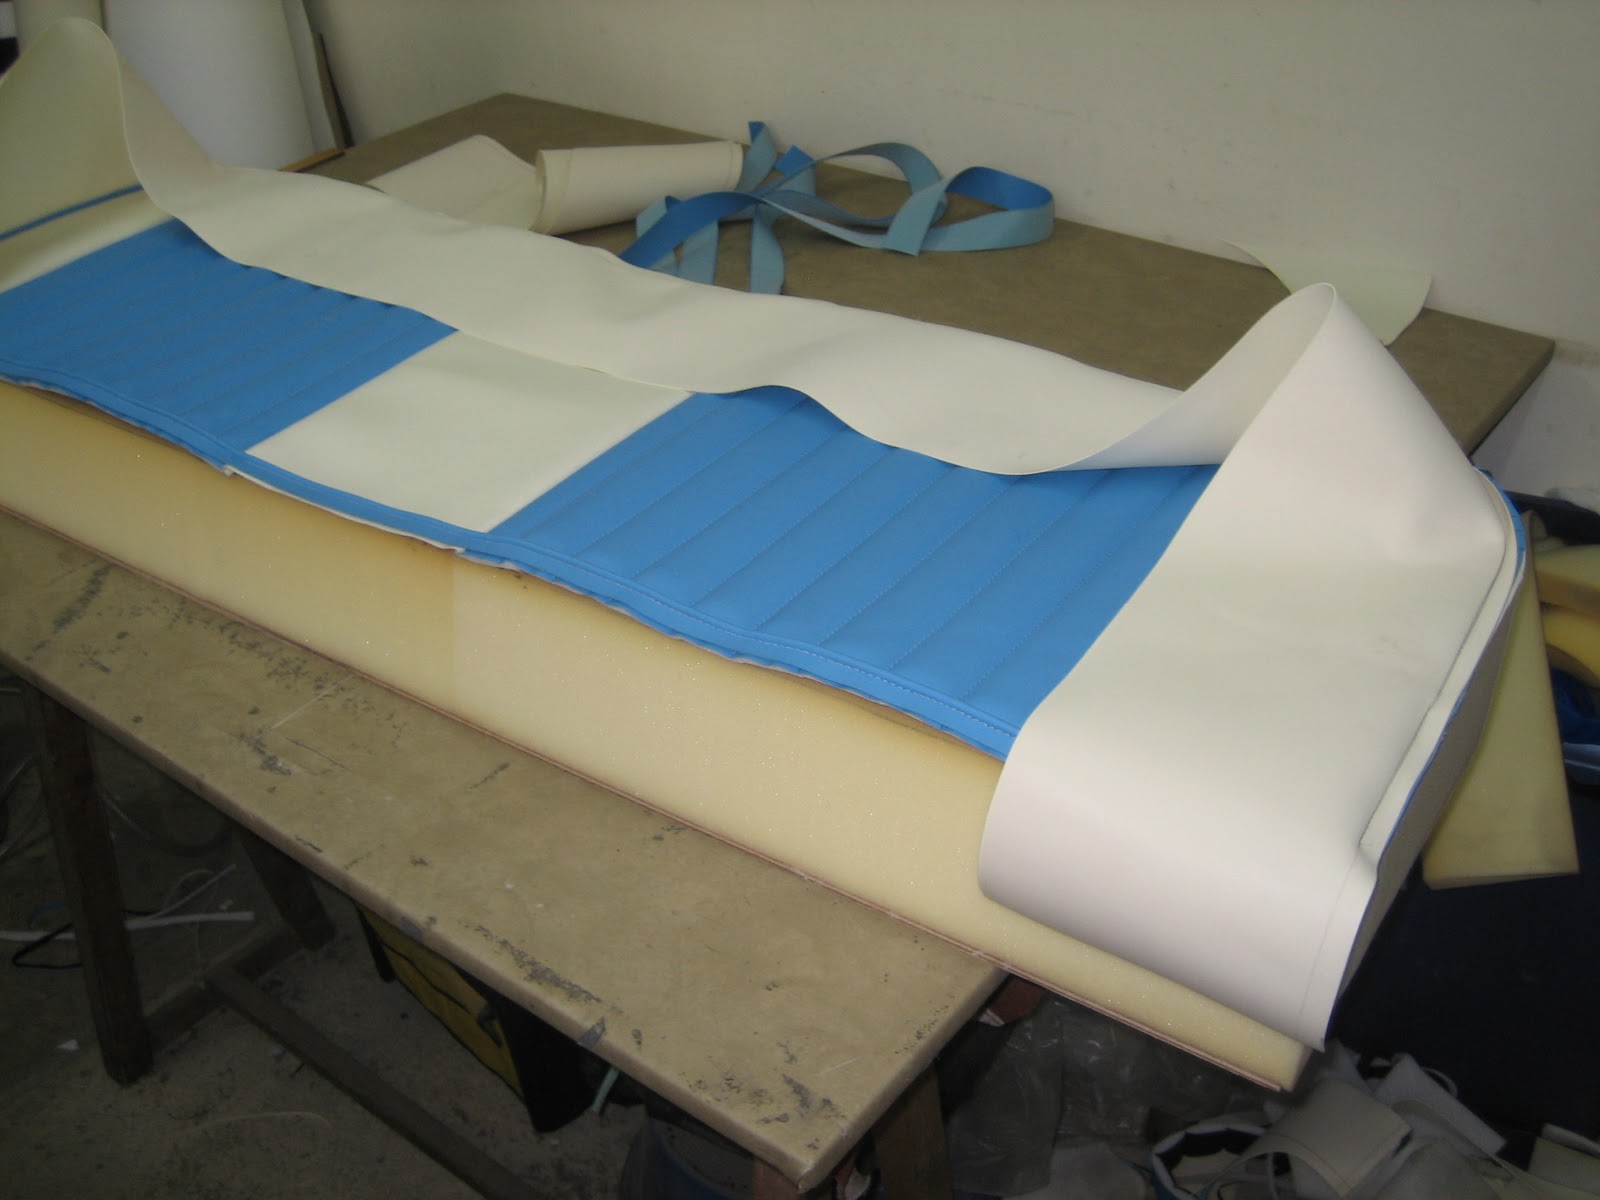
Here you can see the seat taking shape.....the center tuck and roll style going from front to back with the contrast outer panels sew on.......ready for the piping.


And there you go the piping sewing on......at this stage it is best to trial fit to the seat and test the fit.....


There you go......the side boarder sewn on in place....you can see the black marks from the old cover i transferred these over to the new material when cutting so it allows the lining up of the panels...........


This shot shows the base all cleaned and painted up ready for the cover to go on......always make sure the padding's are in good condition....if in doubt replace.........as the finished look will be only as good as the padding inside.............


This is the just come back from the painters look...........again a very important part to getting the end job to look good and last a long time..........


The finished seat..............as i always make sure the lines all match up and i think this very retro look is so great for this van.


A trial fit to see how they look and fit.......spot on.
A different angle....you can see the colours were chosen to match the outer van colour......cant wait to buy an ice cream of this van.............loll 


Just a different picture showing the seats in place.


A step forward in time................all the windows in and trim on and almost ready, You can see the custom opening.... this is going to be the serving area..........


A better angle..you can see my custom frame work being made.......This is to finish the look of the van and to give the customers some cover if it rains............


A closer look ....you can see the bespoke arms made ....these can be removed when not in use......simple.....not !!!!! this took over 3 days to make and get to a finished part.


This is the template being fitted ,I use this as a pattern ...the same process as the seats........ 


 As you can see from the inside......taking time to pattern will make the end job look great.


 All done.......the van in all her glory......waiting for the owner to pick her up and start selling ice creams.......
.

 A angle shot showing the lovely finish and the front cab trimming all ready to go....


 As you can see a very well balanced cab.....comfortable seats and door cards with hard wearing carpet and kick panels for the hard wear that will go on in this ice cream van....


                                                Just a different angle... i love the colours


             A close up with the top open and cover on.... this cover can be put up in 5 Min's by one person..


        Cream colour to match the van look even better when sign written.


 The money shot......... As they say and Wow she look good.....
I hope you all liked the pictures look out for more projects to follow.If you need any help on your project just contact me on : 07794978914
cheers Colin.

Saturday 27 November 2010

Porsche Front Seat Strip Down And Repair

Hello to you all here is a pair of front Porsche seats out of a 911 car, These seats are very rare as the covering on them has Porsche written across the fabric....The customer was keen to keep this material as its no longer available. I had to carefully strip the seats down so he could hand wash the covers ready for me to repair and re fit.....enjoy.....
you can contact me  on : 
email : incavilla@aol.com
tel : 07794978914


This is the seat with it half striped down.......you can see the dirt on the lower left back corner......all of the foam seat swabs were in good condition and with a bit of work and new over foam added they were re used....
.


This is the back and the inner foam striped down and ready for repair and the cleaned cover put back on.


A close up shot showing the wear and split in the foam seat swab.......a easy repair and it be as good as new.


There is the back ready for strip down you can see the writing that makes this cover special.


The seat striped down needing some new piping making up in matching vinyl and sewing in,


This is the back laid out with the outside back panel removed also the piping removed read for cleaning and new piping fixing on...Time for a cuppa.....


This shows the piping cut and sew ready for re sewing....


Here you can see the new piping sew in place a very close match to the original.


The old piping laid  out next to the new....you can see were the old one has worn !!!!!


This is a close up shot of the hand stapler clipping the outside back to the newly washed inside back with the new piping fixed.


A close up shot of the sewing process.......with the piping foot on the sewing machine allowing the piping to be sewn.


All done......wow what a difference a good clean and a new foam layer....it looks as good as new.......Hope you all liked the photos....if you have any questions please feel free and email me....
Thanks....Colin. 

Monday 8 November 2010

BMW R1150 GSA Moter Bike Seat Re Cover...................


Hello  to you all.... well this is a bit of a different job.......A BMW  motor bike seat as you can see the original cover was in two tone colour ,The customer needed major adjustments to the seating height, as he has  long legs the seat height had to be adjusted as you can see in the pictures bellow, I hope you all like.
You can contact me on :
email : incavilla@aol.com 
tel : 07794978914


The angle of the front seat showing how low this made the seat.


Here  you can see the shape that has to be reproduced when add extra foam


The cover all removed ready for my artistic side of me to have fun sculpting ....


This is the very first stage of gluing and shaping the foam.....slowly and carefully till it starts looking right.


There you can see the new foam shaped and ready for the foam topping to go on..... I used a specialised foam cutting electric cutter but a cheap and easy way is a electric calving knife.... dose the job as good.....Remember to ask mum before using...lol.


There all done ready for the top covering. again preparation is key to the finished look.... any lumps or hollows will show up now....very hard to put right.


All done.....just like that.... well not quite.....a few hours of stretching and gently heating the vinyl to help it stretch round the shape.


I hope you all can see the extra shape and height that i achieved..... if you need any help or advice please feel free to ring me or email me.
cheers Colin

VW Bay Window Van, Complete Rear Interior.........

Hello to you all  its time to think about all those jobs that need  to be done to your bus......let me know and i be happy to quote for any trimming needed. Well bellow is some update on a bus that i worked on the front door cards and fitting of IKEA micro kitchen units, i hope you like .


This is the bus ready for me to get stuck in.......


This is a picture showing the rock and roll bed fitted and in place....there are some more pictures in detail of this bed being done in an earlier blog.


This shows the table i made and fitted , it folds away
 allowing the rock and roll bed to be used.....


The IKEA units made up and fitted in to the bus.....a very cost effective way of having top quality units which fit very easily .......


As you can see the rock and roll bed out in all  its glory....ready for the shows .


A closer picture showing the table... note.... you can see the hing joint on the left side.... also you can see the folding table leg...very neat.


A birds eye view showing how important it is to get the upholstery all lined up.


This shows a add on which the customer asked for.... in blue at both sides a pocket for there  phones and bits when in bed.....nice....


Striped back to the bones....... the floor was already down so a good clean and ready to go....You can see the new Blue Bird Kustoms rock and roll bed fitted with new seat belts.


All the units arrive....now the fun begins.....wares the instructions...lol


There we go the first unit being put together and trial fitted, always double cheek as mistakes can be costly as i found out .


The unit in place and you can see the sink bowl ready to be fitted with the pump and drain all fitting in the one cupboard. A jump in picks to the door cards which the customer asked for to be done in the same style as the bed.


The finished look.....looking cool and with those speakers cruising with sounds..........


I treated the  inside of the door with a waxol treatment ...silly not to as how often do the door cards ever come off..............


Here is a picture showing the door card almost done... ready for the final stapling and new fixing clips.


Here you can see me sewing the plain boarder to  the tuck and roll panel, note  the stitch line to help sew too makes the job much easier.


The second door panel all cut and ready to be sew together.


This is were you can see me marking out were the stitch line goes to make the tuck and roll.


This shows the seat of the rock and roll bed being fitted....looking good. PEW......


A close up picture showing the piping just sewn to the top panel. 


Almost done.....the last piece to go on is the back border,this then allows you to fix the covering to the base board.


The large rear cushion in place that makes up the bed when needed.


At the beach with a brew on.....mmm roll on summer.


How important i feel to get all the lines matching up, this makes the van.


The picture says it all..................


The full width rock and roll bed in all its glory....


Plain and simple but looks great in the real.......keep an eye out as I'm sure the table design will be seen on many more buses.....


The van in all her glory........ready for some show sleeping.................


A closer shot of the rear area showing the glove pockets.... i hope you liked the pictures and the info.... if you need any advice or prices on any of the above please feel free to contact me  on : 07794978914
email : incavilla@aol.com
see you all soon Colin.