Search This Blog

Monday 14 March 2011

A Late Bay Window VW Camper Van Front Seat Re Trim


Here  is a picture of a new Brazilian bus that a customer ask me to do some re trimming to make the interior more modern and more in keeping with the bus......I hope you all like the pictures and info given.
you can contact me on : email : incavilla@aol.com
tel : 07794978914


A classic design of caravan upholstery put into a camper van............MMMMM not my choice !!!!!! but it takes all sorts.


This is a different photo showing the rear of the front seats ...these had a problem that the pop-top roof leaked and soaked and this was the reason for the trimming.......

e

Hear are some colour samples of what the customer was wanting.........better than the original.....


The cutting process under way , as you can see the markings on the revers of the marital... this helps with the sewing.


All cut and ready to sew, This is the rock and roll bed unit. this matched with the front seats.


The seat all laid out and you can see the shapes and parts needed to make it fit the base foam swab.


A smiley face......lol , this show the centre panel ready for the tuck and roll sewing.


A close up of the sewing of the centre panel making the tuck and roll style.


The next stage.....the sewing of the side panels stitched together.....a slow process but well worth the finished result.


A different close up picture showing the boarder to the top panel.


All done and ready  to be put onto the foam swab.....


This is the back sewn in the same way and ready to be put on....re using the old but good condition foam.


Ready to have the cover put on....some silicon is used to help the cover slide over the foam.


All done....PEW....a late night needed to get this right, the finished result looks great.


The two seats side by side ready to be put into the van all that's needed is the head rests fitting....job done.


A angle photo of the matching door cards.....these were styled in the same colour and style as the seats.


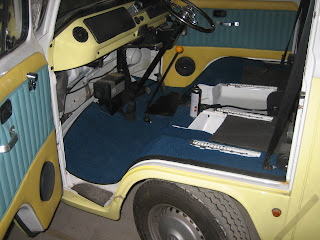
New carpet fitted and glued down....the front kick boards were next on the list to do...

.


As if by magic....well quite a few late nights and cups of tea later....


Just a angle view of the van with new roof seals fitted this stopped the leeks into the van....


There all done........ready for the customer to pic up....this is a great look for this bus, ,it really made a difference to the look and styling ...I hope you all liked, see you all soon for some more updates.. If you need any more info you can contact me on : 07794978914 .
Cheers  
Colin.

Sunday 13 March 2011

split screen camper van head lining upholstery


Hello to you all, Well the new season will soon be hear and and WOW so bizzy.......Bellow I've just finished lining out a split screen tin top conversion with birch  wood ply covered in perforated PVC head lining. this is a great way to finish the roof of your van as using the correct sizes of ply and fitting right it makes the van look complete, I also made and fitted new door cards for this customer to match into the front seat piping , I hope you all like and if any questions please contact me for any questions you may have.


 This is the van ready for the work to be done....hear it goes.....


 This is a close up of the rear section of roof behind the cab area.....this is a small ply liner in place as this guides the main ply head liner into place.

As you can see take this all the way down both sides of the van.


Hear is a close up of the rear head liner cloth fixed into the rear grip fixing ready to be tensioned.


From the other angle and the PVC tensioned and glued to the frame.


Hear you can see the rear of the van with the front part of the liner in place with just four fixing screws to hold it all in place.


The second panel all in and with the rear hinge covers on, All that's needed is the center trim to hide the fixing screws.

From the rear looking forward, looking good. Time for a cuppa....pew....


A side view of the front cab. with the front window surrounds glued in place with the curtain track fitted.


 The door panels are on and ready for some use.......how did i fix them in place ???? no screw holes........


 A life style picture showing the seats and door cards all in place.


 How it all matches and I'm very happy with the end result.


Bye Bye another van ready to hit the road............I hope you all liked the pics , if you have any questions or if you would like your head liner doing please contact me on : 07794978914
email : info@autotrimvw.com
Cheers     COLIN

Sunday 6 March 2011

VW Bay Window Re Trim Rock And Roll Bed And Buddy Seat.

    Hello to you all below is a lat bay window that we had to fit in for a re trim of the front cab head lining and rear rock and roll cushions with a buddy seat............hope you all like............


                  This is the lovely van that  was waiting me Monday morning...........and needed for the Friday the same week..........late nights...................


            As you can see a bit of a mess, but under all the over covers was the original covering.


         The customers were down in Cornwall on a two week holiday.... i had there van for the first week so they can enjoy there new seats in the second week....


 What did we find.... the original Westphalia covering... this was keep for re use as it was in great condition.


                 The buddy seat was ready for some up dating and making look good again.


    Firstly the cab head lining had to be cut sewn and fitted...... This shows it all striped and ready for covering.

                          As if by magic.....a newly made and fitted head liner.........what a difference


 This is the tools ready to strip of all the old covering and foam ready for new foam and covers.


 A close up shot showing the stitching taking shape, The contrast stitching matches the cream outer.


                               All together.... with the tuck and roll with the side boards attached.


                                           Piping all made up and ready to be sewn to the panels.


                 There all done......looking good if i say so my self....loll. A few late nights to get hear...


                  This is a tool i could not do with out, A electric foam knife which makes cutting the foam so much essayer.

                 The under side of the large 3rd cushion, this shows the water Prof lining, it allows the cushion to breath but stops water from getting in to the foam.


   All done....a huge cushion making up the rear of the bay window bed ....sleep tight.


 All done and in place as you can see its important to get the strips lining up, If they are out the whole job looks bad........

 From the other side... showing the large cushion in place ,All you need is some pillows and a quilt...night night....


 This is from the front again.....with a removable right hand side cushion allowing access to a storage unit.


      The buddy seat striped with new foam cut and ready for covering....You can see the markings to work out the tuck and roll placement.


All done.......the buddy seat all done and ready for some use........fixed in place by Velcro for easy use.... I hope you all liked this trim and if you have any questions please contact me.... cheers Colin.