Hello all.... Here's a mix of photos from a great vw bay window bus , I done a full on custom interior in classic tuck and roll styling. We made and fitted a full length rag top sun roof, with a vinyl roof added to give it that classic 70s feel. Hope you all like.
feel free to contact me on :
tel : 07794978914
email : incavilla@aol.com

This is the finished photo of the bus at the beach, bellow is the photo build up to the finished bus , enjoy......


This is the finished photo of the bus at the beach, bellow is the photo build up to the finished bus , enjoy......
This shows the roof ready for a PARIS BEETLES rag top to be fitted. this bus. there was originality a pop top fitted to this bus. we had to remove the old top and re painted and re enforcement bars fitted. This job was a big job but turned out very well .

A vinyl roof was also chosen to be fitted, this goes well with the 70s feel with the bus I masked from the gutter ready for the glue and fitting of the vinyl.

This shows the vinyl roof going on, the front cab area is on and the second part is under way this was a very slow process but best to take your time


Here you can see the excellent carpentry done by a chap called Dan he dose all our bespoke interiors... a top quality job and a great price. As you can see the custom shape was worked out to give the maximum space and the flow of the curves .

The foam is being cut to shape , each section is carefully cut to fit . this is very important to get right as this will make the finished upholstery look good.


This shows the tuck and roll after its just been sewn and ready to be fitted to the back frame work.

This is the first step in the upholstery being attached to the rear frame work. getting the lines all straight is very important.

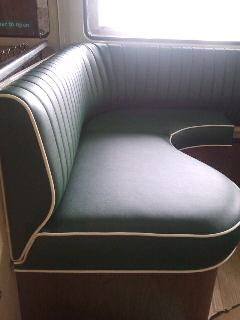
Here you can see the back all finished and ready to fit, the end is finished with contrast piping, Many hours of work but the end result is stunning.

This is a picture looking through the front window, the cab area is now getting the treatment , wiring and sound system being fitted and wow what a sound comes out of this great bus.

Again you can see how far we went to get the electrics and custom dash done, it looks a mess but every wire is there waiting to be connected . then all working and one very modern and tidy cab.

Here you can see the door cards going back in along with the dash and kick boards, you can see the special mount for the iPad that will run all the sound system.

A step further along, all the back trimmed and fitted in place as you can see now how important it is to get the tuck and roll fluting straight .The seat foam pre cut ready and now the cutting and sewing of the seat bases is the next step.

This is ca seat cut sewn and ready to trim to the base board, with white wadding to give the extra soft feeling but also firm.

As if by magic the seating cut sew and trimmed, this gives a good picture showing the detailing of the shapes and contrast piping. the only piece left to do is the base of the rock and roll bed.

Hears a close up shot showing all the seating done with the contrast piping fitted and looking great.


A finished door card ready to be fitted, with speakers in and you may notice a smaller round hole. this is for more speakers.


There you can see the seat in all its glory, with the name of the restaurant embroidered in the centre panel.

All done , this vinyl roof looks great a real head turner. i had to seal the finished edges with a black sealant to stop water seeping in.
Here you can see the excellent carpentry done by a chap called Dan he dose all our bespoke interiors... a top quality job and a great price. As you can see the custom shape was worked out to give the maximum space and the flow of the curves .
The foam is being cut to shape , each section is carefully cut to fit . this is very important to get right as this will make the finished upholstery look good.
This shows the shape of one of the seat sections being cut. You can see how custom the seating is and taking your time getting this right will make such a good finish.
With the seat foam cut and in place, Now onto the back , the foam is cut and put into place , you can see I have marked the tuck and roll in the back foam . I can work out the spacing's ready to cut the cover .
This shows the tuck and roll after its just been sewn and ready to be fitted to the back frame work.
Here you can see the back all finished and ready to fit, the end is finished with contrast piping, Many hours of work but the end result is stunning.
This is a picture looking through the front window, the cab area is now getting the treatment , wiring and sound system being fitted and wow what a sound comes out of this great bus.
Again you can see how far we went to get the electrics and custom dash done, it looks a mess but every wire is there waiting to be connected . then all working and one very modern and tidy cab.
Here you can see the door cards going back in along with the dash and kick boards, you can see the special mount for the iPad that will run all the sound system.
A step further along, all the back trimmed and fitted in place as you can see now how important it is to get the tuck and roll fluting straight .The seat foam pre cut ready and now the cutting and sewing of the seat bases is the next step.
This is ca seat cut sewn and ready to trim to the base board, with white wadding to give the extra soft feeling but also firm.
Hears a close up shot showing all the seating done with the contrast piping fitted and looking great.
A end on picture shows how all the piping lines up and makes the finish look stunning.

Almost there, the rock and roll bed now in place and working just the lower piping to fit and job done.

This is a close up photo showing the embroidery of the SAMS logo that was done especially and wow so good.
A finished door card ready to be fitted, with speakers in and you may notice a smaller round hole. this is for more speakers.

Now for the final clean down of the woodwork and all the special lighting to be tested....................

There ..... the interior in all its glory . All cleaned and ready for work. This bus will be used as a cocktail bus serving drinks from the rear bar area with the seating for the customers to relax in.

The cab area all finished, as you can now see all the wiring tided away with the iPad all in place and working with in stereo to make a magic sound. Some of you may notice the special seating ??? a late bay never came with a bench seat. this was custom made from a different vehicle . we made the frame work to fit the area by cutting down the frame and welding to size, then fitting new padding. Custom upholstered in matching material as rear seating and door cards.

There you can see the seat in all its glory, with the name of the restaurant embroidered in the centre panel.

Now you can see the new full length headlining in place . All black with the custom sun roof lining upholstered in matching material..

Now you can see the custom lights fitted into the roof area on both sides. These are controlled by a remote control unit which changes the light colour and brightness of the lights.

This is a photo showing the lower custom lighting with the green lighting set in place, cant wait to see it all the lights set and going.

There it is all finished and ready to go to shows and events to earn its money. Looks relay great if you have any questions on this conversion or you would like me to quote on any work from full custom work like this to simple repairs you can call me on :


There it is all finished and ready to go to shows and events to earn its money. Looks relay great if you have any questions on this conversion or you would like me to quote on any work from full custom work like this to simple repairs you can call me on :
07794978914 or email me on
incavilla@aol.com
Thanks Colin Rouse