you can contact me on :
email : incavilla@aol.com
tel : 07794978914


This is the van in all its glory....looking very nice, cant wait to get started.

The bench seat in its place....as you can see the hump in the back..

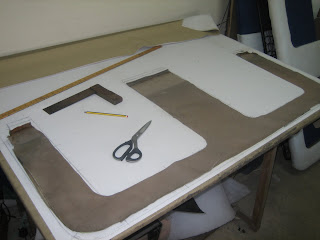
Planning, measuring and working out proportions to get the look that is in balance with the style Ewan and Ali wanted.
There we are all ready for the next stage, making templates may take a long time but in the end it makes the job a whole lot better.
What a sorry state the seat was......well over 40 years of use......time for a make over.....
All striped back and springs were in good condition, a clean down and a lick of paint....look like new. The same process was done on the back.
A new canvas was cut and attached with special clips called hog rings........
The rubber mating was in very good condition ...so with a wash.....yep that's right put in a washing machine it comes up like new....TIP OF THE DAY... With the new foam cut and starting to take shape, you can see the look of what's to come.
A bit of a jump forward , this is the seat and back all ready for the materials to be applied. The centre sections on the seat as well as the backs are now all inset to create the look.
This is the first step , cutting the material to the templates....as in all trades measure twice cut once.... that's what i still do and I'm glad I did .
This is the main area of material to be cut, this is a very awkward shape and you also have to allow for stretch of the new material...BIG headache.
Hear you can see all three colours together ready for the sewing to begin....wish me luck.
The first step is the centre sections, with a tuck and roll style with two inch to a three inch finish with the stitching to highlight this look.
Now the piping.... a strip of material cut to a set width then rolled together with a cord in the middle .this is how it done simple.
The seat ready to be put onto the unit, along the base of this cover there is a wire. This allows you to pull all the material into place and make a stronger edge to finish with.
 OLD SCHOOL .this long needle and special twine, this is used to stitch through the salvage of the centre panel to get the roll affect of the seat and back.
 As you can see the seat all done.....ten cups of tea and many hours of hard work........ but i love this job so satisfying to see the end result.
A different angle so you can see the three colours and the stitching on the home straight just the back to go.
As if by magic well six hours of hard work the back in all its glory.
Closer look, showing the contours of the upholstery and the line of the piping.
There all together and all lining up and looking great....i love the look and colours......very retro.
A face on view .I hope you all liked the info and pics, keep looking as there is a rock and roll bed to do plus a whole van of panels and roof lining to come. thanks again for looking and if i can help with any info or questions you may have on this or any other trimming questions please feel free to contact me.
Colin.


No comments:
Post a Comment